Posts tonen met het label patroon. Alle posts tonen
Posts tonen met het label patroon. Alle posts tonen


gemakkelijk naaipatroon,
naai tutorial,
naaien,
naaipatroon,
patroon,
rippled zipper pouch tutorial,
ritstasje patroon,
ritstasje tutorial,
sewing,
sewing tutorial,
tutorial,
zipper pouch tutorial
Easy rippled zipper pouch tutorial
zondag 6 mei 2012
Af en toe ben ik net een echt meisje. En dan met name wat betreft tasinhoud. In mijn tas raakt een en ander regelmatig hopeloos verloren. Top 5: mijn sleutels, mobiele telefoon, Labello, mp3-speler (ik heb zo’n klein ding, zeer gevaarlijk) en mijn zonnebril.
Sometimes, I am nothing less than a real girliegirl. Especially when it comes to the contents of my bag. Things seem to get hopelessly lost in there. Top 5 of lost items of all times: my keys, mobile phone, lipgloss, mp3 player (I have a tiny one, very dangerous) and my sunglasses.

En dan heb je dus dat je na weken speuren ineens een geplette lipgloss, een kapotte mp3-speler of zonnebril met gebarsten glas onderuit je tas trekt. Dat moet maar een keer gedaan zijn!
So after weeks of digging through your bag you suddenly find a smashed lipgloss, a broken mp3-player or sunglasses with one glass missing. Seriously, I had to put this to an end.
Het werd dus tijd voor een opbergtasje, een veilige met rits. Zodat alle ontsnaplustige spullen gewoon op hun plaats blijven liggen. En een beetje naaister (kuch) gaat dan dus zelf aan de slag. Nu weet ik niet hoe goed jullie al zijn met ritsen, maar ik kan met gewone ritsen inmiddels prima uit de voeten. Over de blinde variant weiger ik het vooralsnog even te hebben.
So it was time for a little purse, as safe one with zipper. So all those nasty things that constantly feel like escaping will be safely locked inside it. And if you know how to work your way around a sewing machine (cough), then you make one yourself. Now I don’t know how you guys feel about zippers, but at the moment I feel rather confident about normal zippers. I however refuse to speak about the blind variety.
Nu had ik niet zo veel zin in een rechttoe rechtaan tasje, maar liever iets met plooitjes. Maar het moest ook beslist niet te moeilijk zijn. En zo werd het gerimpelde ritstasje geboren. Ideaal voor de naaister die snel een leuk tasje in elkaar wil draaien én ideaal voor de beginneling die ritsen heel eng vindt (geen zorg, het hoeft allemaal niet te precies). Hoera.
I didn’t feel like making a standard zippered pouch, I felt like something with pleats. Though, I also was feeling a bit ‘blah’ about a difficult pattern. And that’s how my easy peasy rippled zipper pouch was born. It’s great for the more advanced sewers who just want to sew a quick purse ánd it’s a good project for beginners that feel scared about zippers (don’t worry, you don’t have to be very precise with this pattern).
Oké, het ‘rimpel ritstasje’ patroon met tutorial!
Waarschuwing vooraf: dit ritstasje wordt niet perfect. Het goede nieuws: dat is de bedoeling.
Wat heb je nodig?
Een rits. Die van mij was 22 centimeter lang.
2 stukken stof die flink breder zijn dan je rits. Mijn lappen waren 30x30 centimeter.
2 kleinere stukjes stof: 8 x 5 centimeter.
Bijpassend garen.
Een ritsvoet.
Je naaigerei.
Alright, so here’s my easy rippled zipper pouch tutorial.
A warning before you start: this zipper pouch is not going to look perfect. The good thing is: it isn’t meant to.
What do you need?
A zipper. Mine was 22 centimeters.
2 pieces of fabric: far wider than your zipper. My pieces of fabric measures 30x30 centimeters.
2 smaller pieces of fabric: 8x5 centimeters.
Matching thread.
A zipperfoot.
All you usual sewing gear.


Pak de kleine stukjes stof en strijk deze aan de korte kant een centimeter naar binnen. Plaats de stukjes vervolgens aan de uiteinden van de rits en stik ze vast, over de rits heen.
*Ben je écht lui, dan kun je deze stap zelfs overslaan. Mét deze stap ziet de rits er iets netter afgewerkt uit, maar ach.
Take the short pieces of fabric and iron the short sides a centimeter to the inside. Place them on the ends of your zipper and stitch, right across the zipper.
* If you’re really lazy, you can also skip this step. With this step the zipper looks a bit more finished, but it’s all up to you.

Pak nu de twee grote stukken stof. Stik op ¼ centimeter langs één van de randen zónder aan- of afhechten. Herhaal voor het andere stuk stof.
Now take the larger pieces of fabric. Stitch ¼ centimeters along one edge wíthout going back and forwards a few times at the beginning and the end.

Pak de draadjes aan weerszijden van het lapje stof vast en trek er zachtjes aan. Als het goed is trek je de stof nu naar elkaar toe en ontstaan er rimpels. Herhaal dit voor het andere stuk stof.
Take the pieces of thread on each side of the piece of fabric and pull them softly. You’ll notice how your ‘cropping’ your fabric and it starts to ripple! Repeat this for the other fabric piece.

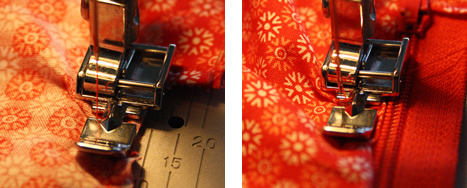
Leg één stuk stof met de goede kant op de goede kant van de rits, plaats de gerimpelde kant tegen de zijkant van de rits. Zet je ritsvoet op je naaimachine en stik de stof vast, vlak langs de rits. Sla de stof om met de goede kant omhoog en stik nogmaals over de stof, vlak langs de rits. Voor extra ‘rimpel-effect’ duw je telkens, vlak voordat je ritsvoetje eroverheen gaat, wat extra stof tegen de rits aan. Herhaal dit met het andere stuk stof.
Put one piece of fabric, good side down, on top of the good side of the zipper. Place the rippled side against the oudside of the zipper. Put your zipper foot on your sewing machine and stitch. Turn the fabric over (the good side is now up) and stitch again. If you want an ‘extra rippled effect’ just push a little fabric towards the zipper foot just before you stitch over it. Repeat with the other pice of fabric.


Rits de rits een stukje open (tot halverwege ongeveer) en vouw de stukken stof tegen elkaar aan, goede kanten op elkaar, en speld vast. Het is nu tijd om te besluiten wat je met de onderkant wilt gaan doen. Ik besloot dat ik geen enorm tasje hoefde, dus knipte zo’n 10 cm van de onderkant af en maakte ronde hoeken met behulp van een bordje. Als je gewoon rechttoe rechtaan hoeken wilt naaien, ook prima natuurlijk.
Zip de zipper halfway open and fold the pieces right sides together and pin in place. It’s time to decide what you want to do about the bottom of the pouch. I decided I wasn’t going to need a huge pouch, so I cut off approximately 10 centimeters from the bottom and made round edges with the help of a saucer. If you want straight edges, that’s fine too of course.

Naai nu helemaal rondom.
Sew all around.

Je kunt de randjes nu nog afwerken met een zigzag of even bijknippen met de kartelschaar. Je kunt in plaats hiervan natuurlijk ook de overlocker gebruiken. Als je rechte hoekjes in je bodem hebt gebruikt moet je nog even de puntje van je hoekjes knippen.
Now finish the seams with a zagzag or cut them with pinking shears. Of course using your serger instead is also a very good option. If you made straight edges for your bottom, make sure you clip of the corners before you turn the bag inside out.

Draai nu binnenstebuiten en taadaa! Je ritstasje is klaar, imperfect en al!
Now turn inside out and voila, your zipper pouch is ready in all its imperfectness!
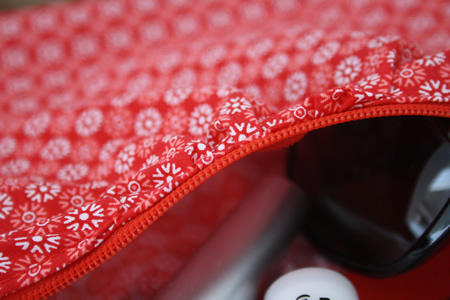
Één en al gerimpelde glorie en zo gemakkelijk te maken. Ik zei het toch?
In all its rippled glory, and so easy to make. I told you so!

Ik ben nu wel erg benieuwd hoe lang al mijn spullen 'niet kwijt' zullen blijven.
I am really curious though as to how long my stuff will stay 'unlost'.
34
Sometimes, I am nothing less than a real girliegirl. Especially when it comes to the contents of my bag. Things seem to get hopelessly lost in there. Top 5 of lost items of all times: my keys, mobile phone, lipgloss, mp3 player (I have a tiny one, very dangerous) and my sunglasses.
En dan heb je dus dat je na weken speuren ineens een geplette lipgloss, een kapotte mp3-speler of zonnebril met gebarsten glas onderuit je tas trekt. Dat moet maar een keer gedaan zijn!
So after weeks of digging through your bag you suddenly find a smashed lipgloss, a broken mp3-player or sunglasses with one glass missing. Seriously, I had to put this to an end.
Het werd dus tijd voor een opbergtasje, een veilige met rits. Zodat alle ontsnaplustige spullen gewoon op hun plaats blijven liggen. En een beetje naaister (kuch) gaat dan dus zelf aan de slag. Nu weet ik niet hoe goed jullie al zijn met ritsen, maar ik kan met gewone ritsen inmiddels prima uit de voeten. Over de blinde variant weiger ik het vooralsnog even te hebben.
So it was time for a little purse, as safe one with zipper. So all those nasty things that constantly feel like escaping will be safely locked inside it. And if you know how to work your way around a sewing machine (cough), then you make one yourself. Now I don’t know how you guys feel about zippers, but at the moment I feel rather confident about normal zippers. I however refuse to speak about the blind variety.
Nu had ik niet zo veel zin in een rechttoe rechtaan tasje, maar liever iets met plooitjes. Maar het moest ook beslist niet te moeilijk zijn. En zo werd het gerimpelde ritstasje geboren. Ideaal voor de naaister die snel een leuk tasje in elkaar wil draaien én ideaal voor de beginneling die ritsen heel eng vindt (geen zorg, het hoeft allemaal niet te precies). Hoera.
I didn’t feel like making a standard zippered pouch, I felt like something with pleats. Though, I also was feeling a bit ‘blah’ about a difficult pattern. And that’s how my easy peasy rippled zipper pouch was born. It’s great for the more advanced sewers who just want to sew a quick purse ánd it’s a good project for beginners that feel scared about zippers (don’t worry, you don’t have to be very precise with this pattern).
Oké, het ‘rimpel ritstasje’ patroon met tutorial!
Waarschuwing vooraf: dit ritstasje wordt niet perfect. Het goede nieuws: dat is de bedoeling.
Wat heb je nodig?
Een rits. Die van mij was 22 centimeter lang.
2 stukken stof die flink breder zijn dan je rits. Mijn lappen waren 30x30 centimeter.
2 kleinere stukjes stof: 8 x 5 centimeter.
Bijpassend garen.
Een ritsvoet.
Je naaigerei.
Alright, so here’s my easy rippled zipper pouch tutorial.
A warning before you start: this zipper pouch is not going to look perfect. The good thing is: it isn’t meant to.
What do you need?
A zipper. Mine was 22 centimeters.
2 pieces of fabric: far wider than your zipper. My pieces of fabric measures 30x30 centimeters.
2 smaller pieces of fabric: 8x5 centimeters.
Matching thread.
A zipperfoot.
All you usual sewing gear.
Pak de kleine stukjes stof en strijk deze aan de korte kant een centimeter naar binnen. Plaats de stukjes vervolgens aan de uiteinden van de rits en stik ze vast, over de rits heen.
*Ben je écht lui, dan kun je deze stap zelfs overslaan. Mét deze stap ziet de rits er iets netter afgewerkt uit, maar ach.
Take the short pieces of fabric and iron the short sides a centimeter to the inside. Place them on the ends of your zipper and stitch, right across the zipper.
* If you’re really lazy, you can also skip this step. With this step the zipper looks a bit more finished, but it’s all up to you.
Pak nu de twee grote stukken stof. Stik op ¼ centimeter langs één van de randen zónder aan- of afhechten. Herhaal voor het andere stuk stof.
Now take the larger pieces of fabric. Stitch ¼ centimeters along one edge wíthout going back and forwards a few times at the beginning and the end.
Pak de draadjes aan weerszijden van het lapje stof vast en trek er zachtjes aan. Als het goed is trek je de stof nu naar elkaar toe en ontstaan er rimpels. Herhaal dit voor het andere stuk stof.
Take the pieces of thread on each side of the piece of fabric and pull them softly. You’ll notice how your ‘cropping’ your fabric and it starts to ripple! Repeat this for the other fabric piece.
Leg één stuk stof met de goede kant op de goede kant van de rits, plaats de gerimpelde kant tegen de zijkant van de rits. Zet je ritsvoet op je naaimachine en stik de stof vast, vlak langs de rits. Sla de stof om met de goede kant omhoog en stik nogmaals over de stof, vlak langs de rits. Voor extra ‘rimpel-effect’ duw je telkens, vlak voordat je ritsvoetje eroverheen gaat, wat extra stof tegen de rits aan. Herhaal dit met het andere stuk stof.
Put one piece of fabric, good side down, on top of the good side of the zipper. Place the rippled side against the oudside of the zipper. Put your zipper foot on your sewing machine and stitch. Turn the fabric over (the good side is now up) and stitch again. If you want an ‘extra rippled effect’ just push a little fabric towards the zipper foot just before you stitch over it. Repeat with the other pice of fabric.
Rits de rits een stukje open (tot halverwege ongeveer) en vouw de stukken stof tegen elkaar aan, goede kanten op elkaar, en speld vast. Het is nu tijd om te besluiten wat je met de onderkant wilt gaan doen. Ik besloot dat ik geen enorm tasje hoefde, dus knipte zo’n 10 cm van de onderkant af en maakte ronde hoeken met behulp van een bordje. Als je gewoon rechttoe rechtaan hoeken wilt naaien, ook prima natuurlijk.
Zip de zipper halfway open and fold the pieces right sides together and pin in place. It’s time to decide what you want to do about the bottom of the pouch. I decided I wasn’t going to need a huge pouch, so I cut off approximately 10 centimeters from the bottom and made round edges with the help of a saucer. If you want straight edges, that’s fine too of course.
Naai nu helemaal rondom.
Sew all around.
Je kunt de randjes nu nog afwerken met een zigzag of even bijknippen met de kartelschaar. Je kunt in plaats hiervan natuurlijk ook de overlocker gebruiken. Als je rechte hoekjes in je bodem hebt gebruikt moet je nog even de puntje van je hoekjes knippen.
Now finish the seams with a zagzag or cut them with pinking shears. Of course using your serger instead is also a very good option. If you made straight edges for your bottom, make sure you clip of the corners before you turn the bag inside out.
Draai nu binnenstebuiten en taadaa! Je ritstasje is klaar, imperfect en al!
Now turn inside out and voila, your zipper pouch is ready in all its imperfectness!
Één en al gerimpelde glorie en zo gemakkelijk te maken. Ik zei het toch?
In all its rippled glory, and so easy to make. I told you so!
Ik ben nu wel erg benieuwd hoe lang al mijn spullen 'niet kwijt' zullen blijven.
I am really curious though as to how long my stuff will stay 'unlost'.
Thank you Design, dining & diapers for featuring me!
crochet pattern,
crochet star,
crocheted winter star,
gehaakte ster,
gehaakte winter ster,
haakpatroon,
patroon,
pattern,
star,
ster,
tutorial,
winter
Patroon: gehaakte winter ster
dinsdag 10 januari 2012
Winter star crochet pattern!
Misschien niet zo heftig als de afgelopen paar jaar, maar het is toch écht winter in Nederland. Oké, om te schaatsen moet je naar de kunstbaan en voor sneeuw naar Oostenrijk. Maar een bordje snert is nog steeds lekker, net als een glaasje Port na het schaatsen. Winter dus. Ook qua haken ben ik een beetje in winterse sferen.
Winter is very mild this year, not at all like the last two years when we were totally snowed in, in The Netherlands. And even though I have to go ice skating at the indoor ring and we would have to travel all the way to Austria to see some snow, it's winter nevertheless. I still like my glass of Port after ice skating and a hot plate of split pea soup. Yes, winter. Also in crochet I'd like to keep things winter.

En daarom haakte ik een winter ster. En het (super eenvoudige) patroontje deel ik natuurlijk graag met jullie.
And therefor, I am crocheting winter stars. And of course I am sharing this (easy peasy) pattern with you guys.
Haakpatroon: winter ster/ crochet pattern: winter star
Om te beginnen: wat heb je nodig? Een beetje mooi garen natuurlijk (ik gebruikte glanskatoen) en een bijpassende haaknaald. Zorg ervoor dat je een beetje los haakt (dus los en relaxt in de pols, ha!)
What do you need? Pretty yarn of course ( I used mercerized cotton) and a matching crochet hook. Make sure you crochet nice and lose for this pattern (so keep that wrist nice and relaxt, ha!).
Gebruikte steken:
L = losse
HV = halve vaste
HV = halve vaste
V = vaste
St = stokje
Dst = dubbel stokje
What stitches will you be using?
Ch = chain
Single crochet = sc
Slip stitch = sl stch
Double crochet = dc
Treble crochet = trc
Ch = chain
Single crochet = sc
Slip stitch = sl stch
Double crochet = dc
Treble crochet = trc
Opgewarmd en stretchoefeningen gedaan? Mooi! Aan de haak dan!
Allereerst! Haak 3 losse en maak een cirkel middels een halve vaste.
Allereerst! Haak 3 losse en maak een cirkel middels een halve vaste.
All warmed up (make sure you stretch first)? Good! Let's hook!
First of all! Chain 3 and make a little circle with a slip stitch!

Tour 1/ Round 1
Haak 3 l (telt als 1 st) and haak nog 5 st in de ring. Maak vast met een halve vaste.
Tour 2/ Round 2
Haak3 losse (telt als 1 st) en haak nog een st in dezelfde steek. Haak nu 2 st in elke steek van de vorige ronde tot je rond bent. Maak vast met een hv.
Chain 3 (counts as 1 dc) and crochet a dc in the same stitch. Crochet 2 dc's in every next stitch untill you've finished the round. Finish with a sl stch in the first dc.

Tour 3/ Round 3
Haak 3 losse (telt als 1 st), haak 3 losse en haak een st in dezelfde steek. *Sla de volgende steek over en haak 1 st, 3 l en 1 st in de volgende steek*, herhaal ** tot je rond bent en maak vast met een hv in het eerste stokje.
Chain 3 (counts as 1 dc), chain 3 and crochet a dc in the same stitch. *Skip the next stitch and put 1 dc ch 3 and dc in the next stitch*, repeat ** untill you've finished the round. Finish the round with a sl stch in the first dc.
Tour 4/ Round 4
In elk groepje van '1 st, 3 l en 1 st' van de vorige tour haak je een v, st, ds, st en v. In de ruimtes tussen de groepjes haak je een halve vaste. Als je rond bent, eindig je met een hv in de eerste v.
In every '1dc, 3 ch 1 dc' group of the last round put a sc, dc, trc, dc and sc. In the spaces between the groups you place a sl stch. When you finish the round, join with a sl stch.
Haak 3 losse (telt als 1 st), haak 3 losse en haak een st in dezelfde steek. *Sla de volgende steek over en haak 1 st, 3 l en 1 st in de volgende steek*, herhaal ** tot je rond bent en maak vast met een hv in het eerste stokje.
Chain 3 (counts as 1 dc), chain 3 and crochet a dc in the same stitch. *Skip the next stitch and put 1 dc ch 3 and dc in the next stitch*, repeat ** untill you've finished the round. Finish the round with a sl stch in the first dc.
Tour 4/ Round 4
In elk groepje van '1 st, 3 l en 1 st' van de vorige tour haak je een v, st, ds, st en v. In de ruimtes tussen de groepjes haak je een halve vaste. Als je rond bent, eindig je met een hv in de eerste v.
In every '1dc, 3 ch 1 dc' group of the last round put a sc, dc, trc, dc and sc. In the spaces between the groups you place a sl stch. When you finish the round, join with a sl stch.
En dan heb je dus een winter ster, gemakkelijk toch? Probeer het gewoon eens en laat me weten wanneer het is gelukt. Ik ben altijd erg nieuwsgierig. En mocht je vragen hebben: schroom niet.
And that's that, you're done and you've crocheted yourself a winter star. Isn't that great! Just try and let me know if it worked out. I'm always very curious you know. And if you have any questions, don't be shy and just ask.
Let op: dit patroon is voor persoonlijk gebruik.
Please take notice: this pattern is for personal use only.
Let op: dit patroon is voor persoonlijk gebruik.
Please take notice: this pattern is for personal use only.
2011 wrap up,
bags,
crochet,
crochet pattern,
haken,
Just Married,
naaien,
patroon,
reizen,
sewing,
tassen,
travel,
tutorial,
wrap up
2011 wrap up
zaterdag 31 december 2011
Het is bijna gedaan, 2011. Nog een paar uur aftellen en dan begint het nieuwe jaar. Ik kan niet wachten en ben altijd vreselijk benieuwd naar wat zo'n nieuw jaar gaat brengen. Maar natuurlijk ben ik nog wel zo sentimenteel dat ik 2011 goed wil uitzwaaien.

It's almost over and done, 2011. Just a few more hours of count down and then it's the start of a new year. I always look forward to a new year and I'm always very curious to what it will bring. But of course I have to get sentimental first and say a proper goodbye to 2011.
Er is zo veel gebeurd in 2011! Ik ben deze blog gestart (ja, toch best belangrijk!), want ik wilde leren haken en naaien. Wat vaker iets dragen en cadeau geven wat zelf gemaakt is, in plaats van 'zo maar' alles in de winkel kopen. Ik zag zo veel leuke blogs met lieve (en grappige, vele van jullie zijn hilarisch) mensen, goede ideeën en prachtige creaties. Ik hoop dat mijn blogje iets kan bijdragen.
So much has happened in 2011. I started this blog (hey, kinda important!), 'cause I wanted to learn how to crochet and sew. So I could wear and give away handmade things instead of always buying things from a store. I saw so many great blogs from sweet (and funny, you guys are often hilarious) people, great ideas and gorgious creations. I hope my blittle blog will add something.
Ik leerde haken, gewoon met een biebboek, filmpjes op YouTube en één bol donkerblauwe wol en haaknaald 5. Inmddels zijn er héél wat bollen wol en katoen en haaknaalden bijgekomen!

I taught myself to crochet with the help of a book from the library, some movies on YouTube and one ball of navy blue wool and hook 5 mm. The crochet bug has definately bitten me and trust me, there's a lage number of yarn balls and crochet hooks now living with me.
Ik heb zelfs een aantal dekens gehaakt. Dat had ik dus echt nooit verwacht! Maar ik ben er wel blij mee. En ik prutste net zo lang, totdat ik wat haakpatronen met jullie kon delen.

I even got to finish some blankets! If you had told me that at the beginning of this year I wouldn't have believed you. But I did, several! Can you imagine. I am so happy with the results. I also crocheted so much that I was able to make some patterns to share with you.
Ik ging ook op naailes en kocht mijn eerste naaimachine. In het begin had ik vaak ruzie met mijn masjien (waarom heb ik toch steeds lussen aan de onderkant? Waarom loopt mijn draad steeds vast?), maar inmiddels zijn mijn Toyota en ik dikke vrienden en hebben we al best wat mooie dingen tot stand gebracht. Favoriet bij mij zijn tassen. Dat weten jullie inmiddels!

I also took sewing lessons and bought my first sewing machine! The machine and me didn't always get along in the beginning (why are there all these loops? Why does it keep eating my thread?) but we've gotten to know each other and I think me and my sewing machine have made some great stuff this year. For starters (as you know, my favorite...): bags, lots of bags.
Maar ik heb natuurlijk ook andere dingen genaaid. Het is gewoon te leuk om te doen.
But of course I've sewn other stuff too, it's just so nice to create all this stuff!

Maar ook op andere gebieden ging het erg goed! Ik houd ontzettend van reizen en heb dit jaar een aantal erg mooie landen mogen bezoeken: Kroatië en Turkije. Daarnaast ging ik voor mijn werk naar Brussel (zo gaaf) en maakte ik een reis naar Rome... dat was mijn huwelijksreis!

I was also fortunate enough to travel this year. I love to travel and I was so lucky to visit some amazing countries: Croatia and Turkey. I visited Brussels for work (totally awesome) and I made a trip to Rome... that was my honeymoon!
Ja! Een huwelijksreis! Want dit jaar vroeg mijn lief me ten huwelijk en zijn we getrouwd! In september. We hebben dit héél stiekem en klein aangepakt en ik vond het een heerlijke dag!
Yes, a honeymoon! My love proposed to me and we got married this year. In September. We had a really small wedding that not many people knew about. And I loved every second of it.

En mijn trouwjurk? Die kocht ik via Etsy! Lang leve creatieve mensen die ik via deze blog heb 'leren kennen'!
And my weddingdress? I bought that on Etsy! I just love all the fantastic, creative people I've 'met' because of this blog.
Nou, sentimenteel of sentimenteel (Kleenex moment!)? Rest mij nog één ding te zeggen: wat vind ik het leuk dat jullie mijn blog komen bezoeken en berichten achter laten, telkens weer. Fantastisch. Ik geniet er met volle teugen van. Ik blijf jullie (en alles wat jullie maken) trouw volgen in 2012.
Sentimental? Moi? (Should I pass around some Kleenex?). I just have one more thing to say: I just love that you guys keep visiting my blogs and leaving those sweet comments. It's fantastic. Thank you so much. I will continue to read your blogs and watch all your wonderful creations in 2012.
17
It's almost over and done, 2011. Just a few more hours of count down and then it's the start of a new year. I always look forward to a new year and I'm always very curious to what it will bring. But of course I have to get sentimental first and say a proper goodbye to 2011.
Er is zo veel gebeurd in 2011! Ik ben deze blog gestart (ja, toch best belangrijk!), want ik wilde leren haken en naaien. Wat vaker iets dragen en cadeau geven wat zelf gemaakt is, in plaats van 'zo maar' alles in de winkel kopen. Ik zag zo veel leuke blogs met lieve (en grappige, vele van jullie zijn hilarisch) mensen, goede ideeën en prachtige creaties. Ik hoop dat mijn blogje iets kan bijdragen.
So much has happened in 2011. I started this blog (hey, kinda important!), 'cause I wanted to learn how to crochet and sew. So I could wear and give away handmade things instead of always buying things from a store. I saw so many great blogs from sweet (and funny, you guys are often hilarious) people, great ideas and gorgious creations. I hope my blittle blog will add something.
Ik leerde haken, gewoon met een biebboek, filmpjes op YouTube en één bol donkerblauwe wol en haaknaald 5. Inmddels zijn er héél wat bollen wol en katoen en haaknaalden bijgekomen!
I taught myself to crochet with the help of a book from the library, some movies on YouTube and one ball of navy blue wool and hook 5 mm. The crochet bug has definately bitten me and trust me, there's a lage number of yarn balls and crochet hooks now living with me.
Ik heb zelfs een aantal dekens gehaakt. Dat had ik dus echt nooit verwacht! Maar ik ben er wel blij mee. En ik prutste net zo lang, totdat ik wat haakpatronen met jullie kon delen.
I even got to finish some blankets! If you had told me that at the beginning of this year I wouldn't have believed you. But I did, several! Can you imagine. I am so happy with the results. I also crocheted so much that I was able to make some patterns to share with you.
Ik ging ook op naailes en kocht mijn eerste naaimachine. In het begin had ik vaak ruzie met mijn masjien (waarom heb ik toch steeds lussen aan de onderkant? Waarom loopt mijn draad steeds vast?), maar inmiddels zijn mijn Toyota en ik dikke vrienden en hebben we al best wat mooie dingen tot stand gebracht. Favoriet bij mij zijn tassen. Dat weten jullie inmiddels!
I also took sewing lessons and bought my first sewing machine! The machine and me didn't always get along in the beginning (why are there all these loops? Why does it keep eating my thread?) but we've gotten to know each other and I think me and my sewing machine have made some great stuff this year. For starters (as you know, my favorite...): bags, lots of bags.
Maar ik heb natuurlijk ook andere dingen genaaid. Het is gewoon te leuk om te doen.
But of course I've sewn other stuff too, it's just so nice to create all this stuff!
Maar ook op andere gebieden ging het erg goed! Ik houd ontzettend van reizen en heb dit jaar een aantal erg mooie landen mogen bezoeken: Kroatië en Turkije. Daarnaast ging ik voor mijn werk naar Brussel (zo gaaf) en maakte ik een reis naar Rome... dat was mijn huwelijksreis!
I was also fortunate enough to travel this year. I love to travel and I was so lucky to visit some amazing countries: Croatia and Turkey. I visited Brussels for work (totally awesome) and I made a trip to Rome... that was my honeymoon!
Ja! Een huwelijksreis! Want dit jaar vroeg mijn lief me ten huwelijk en zijn we getrouwd! In september. We hebben dit héél stiekem en klein aangepakt en ik vond het een heerlijke dag!
Yes, a honeymoon! My love proposed to me and we got married this year. In September. We had a really small wedding that not many people knew about. And I loved every second of it.
En mijn trouwjurk? Die kocht ik via Etsy! Lang leve creatieve mensen die ik via deze blog heb 'leren kennen'!
And my weddingdress? I bought that on Etsy! I just love all the fantastic, creative people I've 'met' because of this blog.
Nou, sentimenteel of sentimenteel (Kleenex moment!)? Rest mij nog één ding te zeggen: wat vind ik het leuk dat jullie mijn blog komen bezoeken en berichten achter laten, telkens weer. Fantastisch. Ik geniet er met volle teugen van. Ik blijf jullie (en alles wat jullie maken) trouw volgen in 2012.
Sentimental? Moi? (Should I pass around some Kleenex?). I just have one more thing to say: I just love that you guys keep visiting my blogs and leaving those sweet comments. It's fantastic. Thank you so much. I will continue to read your blogs and watch all your wonderful creations in 2012.
~Have a fantastic 2012 everyone!!~
Beanie pattern for your man
dinsdag 6 december 2011
The Men's beanie crochet pattern has been moved to the new website of Happy in Red.
Gehaakte must man? Dit haakpatroon is verplaatst naar de nieuwe website van Happy in Red.
Christmas ornaments,
crochet,
DIY,
haken,
naaien,
patroon,
pattern,
sewing,
tutorial,
vilten kerstballen
DIY Christmas ornaments
zaterdag 19 november 2011
Je kerstboomversiering niet in de winkel kopen of misschien wil je je huis wel opleuken met iets dat je zelf hebt gemaakt? Gewoon doen: het is echt heel gemakkelijk. Ik maakte een hele stapel van deze vilten kerstballen in een middagje. No worries, ik leg het uit!

Would you like to decorate your Christmas tree or your house with something fun that you've made yourself? Do it! I made an entire pile of these ornaments in one afternoon. Don't worry, I'll give you a little tutorial!
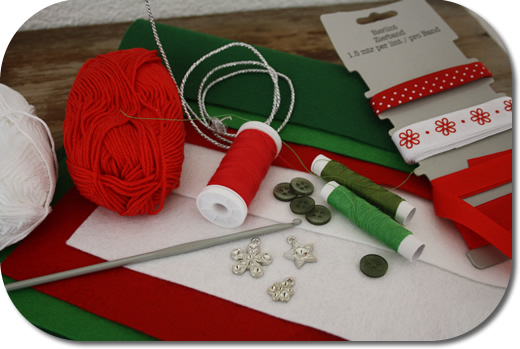
Je hebt nodig:
- Vilt! Ik kocht ‘echte’ kerstkleuren, maar je kunt natuurlijk kiezen wat je wil.
- Gemercieerd haakkatoen. Ik gebruikte Phil Coton 3.
- Bijpassende haaknaald.
- Bedeltjes, leuke knoopjes of kralen.
- Bijpassend naaigaren.
- Bijpassend lint.
You need:
- Felt. I bought typical Christmas colours, but you can buy any colour you like of course.
- Mercerized cotton to crochet. I used Phil Coton 3.
- Matching crochet hook.
- Some charms, cute buttons or beads.
- Matching thread.
- Matching ribbon.
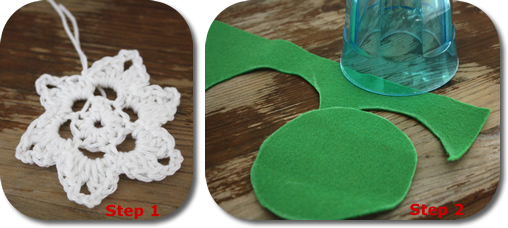
Crochet a star, snow flake or flower. Nice patterns can be found at Lucy, The Royal Sisters or Karin aan de Haak. Fasten off and weave in the ends.
Find a glass or cup with a diameter that’s a little bit bigger than your crocheted star or snowflake. Trace 2 circles and cut them out.

Sew your crochet star or snowflake with one point to the circle.
And while you’re at it: sew on the charm, button or bead on at the same point.
On the back of the circle you sew on the ribbon at the same spot as you’ve sewn the crochet star and the charm. (So, it’s all sewing on the same spot. Nice and easy, huh).

Take your second circle and put it against the back of your first circle. Sew them together with small stitches.

Zei ik niet dat het gemakkelijk was? Mocht je vragen hebben of deze vilten kerstballen hebben gemaakt (zien, zien, zien!!), laat het me vooral even weten!
Now, didn't I tell you these Christmas ornaments were easy to make? If you have a question about these or if you've made some (show me!), please let me know okay!
59
Would you like to decorate your Christmas tree or your house with something fun that you've made yourself? Do it! I made an entire pile of these ornaments in one afternoon. Don't worry, I'll give you a little tutorial!
Je hebt nodig:
- Vilt! Ik kocht ‘echte’ kerstkleuren, maar je kunt natuurlijk kiezen wat je wil.
- Gemercieerd haakkatoen. Ik gebruikte Phil Coton 3.
- Bijpassende haaknaald.
- Bedeltjes, leuke knoopjes of kralen.
- Bijpassend naaigaren.
- Bijpassend lint.
You need:
- Felt. I bought typical Christmas colours, but you can buy any colour you like of course.
- Mercerized cotton to crochet. I used Phil Coton 3.
- Matching crochet hook.
- Some charms, cute buttons or beads.
- Matching thread.
- Matching ribbon.
Step 1
Haak een ster, sneeuwvlok of bloem. Leuke patronen kun je bijvoorbeeld vinden bij Lucy , The Royal Sisters of Karin aan de Haak. Hecht af en werk de draadjes af.Crochet a star, snow flake or flower. Nice patterns can be found at Lucy, The Royal Sisters or Karin aan de Haak. Fasten off and weave in the ends.
Step 2
Zoek een glas of beker die een iets grotere omtrek heeft dan je haakwerkje. Trek deze twee keer om en knip uit.Find a glass or cup with a diameter that’s a little bit bigger than your crocheted star or snowflake. Trace 2 circles and cut them out.
Step 3
Naai je gehaakte ster of sneeuwvlok aan één punt vast bovenaan een cirkel. Sew your crochet star or snowflake with one point to the circle.
Step 4
En naai meteen het bedeltje of je knoop vast op datzelfde punt.And while you’re at it: sew on the charm, button or bead on at the same point.
Step 5
Aan de achterkant van de cirkel naai je het lint vast op dezelfde plek als je de gehaakte ster en het bedeltje hebt vastgenaaid. (Dus allemaal op dezelfde plek naaien, lekker overzichtelijk).On the back of the circle you sew on the ribbon at the same spot as you’ve sewn the crochet star and the charm. (So, it’s all sewing on the same spot. Nice and easy, huh).
Step 6
Pak de tweede vilten cirkel erbij en leg die tegen de achterkant van je eerste cirkel aan. Naai ze aan elkaar vast met kleine steekjes.Take your second circle and put it against the back of your first circle. Sew them together with small stitches.
Zei ik niet dat het gemakkelijk was? Mocht je vragen hebben of deze vilten kerstballen hebben gemaakt (zien, zien, zien!!), laat het me vooral even weten!
Now, didn't I tell you these Christmas ornaments were easy to make? If you have a question about these or if you've made some (show me!), please let me know okay!
Have fun!
~Have a great weekend, all of you!~
crochet,
crochet pattern,
crochet pumpkin,
gehaakte pompoen,
haakpatroon,
haken,
patroon,
patroon gehaakte pompoen,
pattern,
pattern crochet pumpkin
Patroon: gehaakte pompoen
woensdag 28 september 2011
The free (!) crochet pumpkin pattern has been moved to the new Happy in Red website.
Het gratis patroon voor een gehaakte pompoen is verhuisd naar de nieuwe website van Happy in Red.
crochet,
crochet flowers,
gehaakte bloemen,
patroon,
patroon gehaakte bloem,
pattern,
pattern crochet flower
Patroon: gehaakte bloem
donderdag 5 mei 2011
The crochet flower pattern (free and easy!) has moved to the new website of Happy in Red.
Het gratis haakpatroon van deze gehaakte bloem is verhuisd naar de nieuwe website van Happy in Red.
Abonneren op:
Posts (Atom)