Crocheting a granny square blanket is fun! And I found out that crocheting a granny stripe blanket is also fantastic! Though one thing is tough: making the edge along the granny stripe blanket. 'Cause along the 'long' side of the blanket you don't have thos handy speaces between 'grann clusters' like you have with granny square blankets. It took me a little while to get it right, but I got there!
En omdat ik daar zo opgelucht over was, heb ik het maar meteen even vastgelegd voor het nageslacht. Dus doe je voordeel met deze tutorial.
And because I was so relieved to have finally gotten it right, I just made a tutorial out of it. So crochet along if you are just about to finish your granny stripe blanket.
Even voor de duidelijkheid: dit patroon is niet per se 'van mij'. Ik varieer gewoon wat met bestaande steken en wil jullie graag laten meedelen in hoe ik het heb aangepakt. In een easy peasy 5-stappenplan!
Just to be clear: I am not claiming this pattern as my own. It's just my own variety on existing stitches and I just thought you'd like to see how I did this. Just follow my easy peasy 5 step plan.

Stap 1 - Step 1
Maak een granny stripe deken (of eerst een proeflapje om te oefenen) volgens de aanwijzingen van Lucy of Karin.
Make a granny stripe blanket (or a small tester to try out the pattern) according to Lucy's or Karins tutorial.

Stap 2 - Step 2
Hecht een nieuwe kleur aan in een opening tussen 2 granny clusters. Haak 3 lossen (telt als een stokje), haak nog 2 stokjes in dezelfde ruimte. *Haak een losse en dan 3 stokjes in de volgende opening*. Herhaal ** tot de hoek. In de hoek maak je 3 stokjes 1 losse en 3 stokjes.
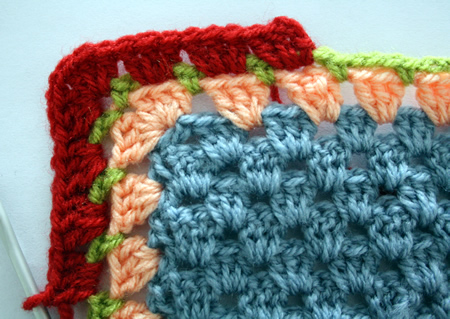
Nu ben je aan de 'lange kant' van de deken beland. Je ziet dat er 'ruimte' is tussen de rijen met granny clusters. In die ruimte plaats je je groepjes van 3 stokjes. Tussen elk groepje haak je een losse.
Start with a new colour in a space between 2 granny clusters. Chain 3 (counts as one double crochet), crochet 2 more dc's in the same space. *Chain 1 and crochet 3 dc's in the next space*. Repeat this till you get to the corner. Into the corner you crochet 3 dc's 1 ch 3 dc's.
Now you're at the difficult 'long side' of the blanket. If you look well you see a 'space' between the seperate rows of granny clusters. In this space you crochet your 3 dc clusters. Between clusters you chain 1.

Stap 3 - Step 3
Hecht een nieuwe kleur aan en haak een losse (telt als 1 vaste). Haak 3 losse en plaats een vaste tussen de granny clusters van de vorige ronde. In de hoek plaats je 1 vaste 3 losse en 1 vaste.
Start a new colour and chain 1 (counts as 1 sc). Chain 3 and place a sc between the spaces of the granny clusters of the last round. In the corner you crochet 1 sc ch 3 1 sc.

Stap 4 - Step 4
Hecht een nieuwe kleur aan in een 3 lossen-lus van de vorige ronde. Haak 3 losse (telt als 1 stokje) en plaats 2 stokjes in dezelfde lus. Haak 3 stokjes in de volgende lus. Let op! Tussen de 3 st clusters haak je geen losse! In de hoeken haak je 3 stokjes 1 losse 3 stokjes.
Start a new colour in a 3 ch loop of the last round. Chain 3 (counts as 1 dc) and put 2 dc's in the same space. Crochet 3 dc's in the next loop. Beware! Don't put ch 1 between the 3 dc clusters! In the corners you crochet 3 dc's 1 ch 3 dc's.
Niet zo moeilijk, toch? Nou, je bent er bijna!
Easy does it, right? Well, you're almost there.
Easy does it, right? Well, you're almost there.

Stap 5 - Step 5
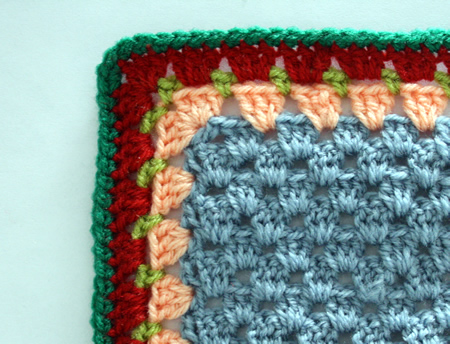
Hecht een nieuwe kleur aan en haak een vaste in elke steek van de vorige tour. In de hoeken haak je 3 vasten.
Start a new colour and place a sc in every stitch of the last round. In the corners you crochet 3 sc's.
Zo krijgt elke mooie granny streep deken het mooie randje dat het verdient.
And that's how you can give a pretty granny stripe blanket the edging it deserves.


Mooi randje inderdaad. Helemaal in stijl afgewerkt!
BeantwoordenVerwijderenHeel mooi geworden en bedankt voor de tutorial!
BeantwoordenVerwijderenSchoon gedaan!
BeantwoordenVerwijderenXxx
Hallo,
BeantwoordenVerwijderenGeweldig dit stappenplan, dit nodigt uit om het ook te gaan proberen. Bedankt daarvoor.
Lieve groetjes,
CreativEls
http://koekjehaakjemaakje.blogspot.com
Helemaal heerlijk zo'n duidelijke tutorial!
BeantwoordenVerwijderenSuper dat je hem hebt neergezet! Dank je wel!!!!!!!
Ik vind de deken zo ontzettend mooi... De kleuren zijn echt prachtig bij elkaar!
BeantwoordenVerwijderenThank you for the tutorial on that! It will come in handy when I make mine. Can I ask what kind of yarn you used? Your colors are SO pretty! For years I used any kind of yarn but I am wiser now and get the good stuff and it makes a real difference I think. It doesn't have to be super expensive but all your projects look like they were made with a quality yarn. Your color combinations are just sensational...love them all!
BeantwoordenVerwijderenHeel mooi randje en dekentje ook, hoor, dank je wel!
BeantwoordenVerwijderenHa, dank je voor de uitleg. Ik ben ook bezig met een strependeken en ik zat al te bedenken hoe ik dat het mooiste kon afwerken. Nu heb ik het gezien. Makkie! (hoop ik)
BeantwoordenVerwijderenDat dekentje vind ik zo mooi. Heel knap gedaan.
BeantwoordenVerwijderenik hjeb een hele mand vol met dezelfde wol. mag ik je vragen hoeveel steken je voor deze deken hebt gebruikt. je hebt me aangestokem :-)))
BeantwoordenVerwijderenOne day I'm going to learn to crochet...
BeantwoordenVerwijderenThanks for linking to a Round Tuit!
Hope you have a fabulous week!
Jill @ Creating my way to Success
http://www.jembellish.blogspot.com/
Ik vind hem echt super! Fijn dat je de truc van de rand deelt! Welk materiaal heb je gebruikt? ik ben helemaal weg van de kleuren.
BeantwoordenVerwijderenGroetjes,
Esther
Estheradeleeuw@gmail.com
Hi there
BeantwoordenVerwijderenBrowsing around your place. I think I have found a way of edging my Gypsy blanket... Although I have just realized it needs to be even larger... I think I need about 30+ mini squares still... Thanks for sharing this. I really like the folklore look that the mix of colors and stitches are making. :D
PS Thanks for your encouragement. Couldn't have come in a better moment. I was just ready to give up all dreams today...
Thank- you so much for generously posting this. I am finally finishing off a blanket that I started yrs ago and I am using this border on it. Your kindness is much appreciated.
BeantwoordenVerwijderenAj
Thanks for a marvеlouѕ poѕting!
BeantwoordenVerwijderenI definitelу еnјoyеd reading іt, уou
haρpen to bе a great аuthor. I will make
surе to bookmark уour blog and will come back in the future.
I ωant to encouгage you to ԁefinitely continue your great work, have a nice
morning!
Also visit my site - hcg body shaper
I just love, love, LOVE this edging! I'm using it as a edging on a scarf im working on. Thank you for posting this pattern.
BeantwoordenVerwijderen