Af en toe ben ik net een echt meisje. En dan met name wat betreft tasinhoud. In mijn tas raakt een en ander regelmatig hopeloos verloren. Top 5: mijn sleutels, mobiele telefoon, Labello, mp3-speler (ik heb zo’n klein ding, zeer gevaarlijk) en mijn zonnebril.
Sometimes, I am nothing less than a real girliegirl. Especially when it comes to the contents of my bag. Things seem to get hopelessly lost in there. Top 5 of lost items of all times: my keys, mobile phone, lipgloss, mp3 player (I have a tiny one, very dangerous) and my sunglasses.
En dan heb je dus dat je na weken speuren ineens een geplette lipgloss, een kapotte mp3-speler of zonnebril met gebarsten glas onderuit je tas trekt. Dat moet maar een keer gedaan zijn!
So after weeks of digging through your bag you suddenly find a smashed lipgloss, a broken mp3-player or sunglasses with one glass missing. Seriously, I had to put this to an end.
Het werd dus tijd voor een opbergtasje, een veilige met rits. Zodat alle ontsnaplustige spullen gewoon op hun plaats blijven liggen. En een beetje naaister (kuch) gaat dan dus zelf aan de slag. Nu weet ik niet hoe goed jullie al zijn met ritsen, maar ik kan met gewone ritsen inmiddels prima uit de voeten. Over de blinde variant weiger ik het vooralsnog even te hebben.
So it was time for a little purse, as safe one with zipper. So all those nasty things that constantly feel like escaping will be safely locked inside it. And if you know how to work your way around a sewing machine (cough), then you make one yourself. Now I don’t know how you guys feel about zippers, but at the moment I feel rather confident about normal zippers. I however refuse to speak about the blind variety.
Nu had ik niet zo veel zin in een rechttoe rechtaan tasje, maar liever iets met plooitjes. Maar het moest ook beslist niet te moeilijk zijn. En zo werd het gerimpelde ritstasje geboren. Ideaal voor de naaister die snel een leuk tasje in elkaar wil draaien én ideaal voor de beginneling die ritsen heel eng vindt (geen zorg, het hoeft allemaal niet te precies). Hoera.
I didn’t feel like making a standard zippered pouch, I felt like something with pleats. Though, I also was feeling a bit ‘blah’ about a difficult pattern. And that’s how my easy peasy rippled zipper pouch was born. It’s great for the more advanced sewers who just want to sew a quick purse ánd it’s a good project for beginners that feel scared about zippers (don’t worry, you don’t have to be very precise with this pattern).
Oké, het ‘rimpel ritstasje’ patroon met tutorial!
Waarschuwing vooraf: dit ritstasje wordt niet perfect. Het goede nieuws: dat is de bedoeling.
Wat heb je nodig?
Een rits. Die van mij was 22 centimeter lang.
2 stukken stof die flink breder zijn dan je rits. Mijn lappen waren 30x30 centimeter.
2 kleinere stukjes stof: 8 x 5 centimeter.
Bijpassend garen.
Een ritsvoet.
Je naaigerei.
Alright, so here’s my easy rippled zipper pouch tutorial.
A warning before you start: this zipper pouch is not going to look perfect. The good thing is: it isn’t meant to.
What do you need?
A zipper. Mine was 22 centimeters.
2 pieces of fabric: far wider than your zipper. My pieces of fabric measures 30x30 centimeters.
2 smaller pieces of fabric: 8x5 centimeters.
Matching thread.
A zipperfoot.
All you usual sewing gear.
Pak de kleine stukjes stof en strijk deze aan de korte kant een centimeter naar binnen. Plaats de stukjes vervolgens aan de uiteinden van de rits en stik ze vast, over de rits heen.
*Ben je écht lui, dan kun je deze stap zelfs overslaan. Mét deze stap ziet de rits er iets netter afgewerkt uit, maar ach.
Take the short pieces of fabric and iron the short sides a centimeter to the inside. Place them on the ends of your zipper and stitch, right across the zipper.
* If you’re really lazy, you can also skip this step. With this step the zipper looks a bit more finished, but it’s all up to you.
Pak nu de twee grote stukken stof. Stik op ¼ centimeter langs één van de randen zónder aan- of afhechten. Herhaal voor het andere stuk stof.
Now take the larger pieces of fabric. Stitch ¼ centimeters along one edge wíthout going back and forwards a few times at the beginning and the end.
Pak de draadjes aan weerszijden van het lapje stof vast en trek er zachtjes aan. Als het goed is trek je de stof nu naar elkaar toe en ontstaan er rimpels. Herhaal dit voor het andere stuk stof.
Take the pieces of thread on each side of the piece of fabric and pull them softly. You’ll notice how your ‘cropping’ your fabric and it starts to ripple! Repeat this for the other fabric piece.
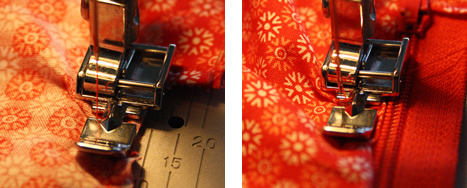
Leg één stuk stof met de goede kant op de goede kant van de rits, plaats de gerimpelde kant tegen de zijkant van de rits. Zet je ritsvoet op je naaimachine en stik de stof vast, vlak langs de rits. Sla de stof om met de goede kant omhoog en stik nogmaals over de stof, vlak langs de rits. Voor extra ‘rimpel-effect’ duw je telkens, vlak voordat je ritsvoetje eroverheen gaat, wat extra stof tegen de rits aan. Herhaal dit met het andere stuk stof.
Put one piece of fabric, good side down, on top of the good side of the zipper. Place the rippled side against the oudside of the zipper. Put your zipper foot on your sewing machine and stitch. Turn the fabric over (the good side is now up) and stitch again. If you want an ‘extra rippled effect’ just push a little fabric towards the zipper foot just before you stitch over it. Repeat with the other pice of fabric.
Rits de rits een stukje open (tot halverwege ongeveer) en vouw de stukken stof tegen elkaar aan, goede kanten op elkaar, en speld vast. Het is nu tijd om te besluiten wat je met de onderkant wilt gaan doen. Ik besloot dat ik geen enorm tasje hoefde, dus knipte zo’n 10 cm van de onderkant af en maakte ronde hoeken met behulp van een bordje. Als je gewoon rechttoe rechtaan hoeken wilt naaien, ook prima natuurlijk.
Zip de zipper halfway open and fold the pieces right sides together and pin in place. It’s time to decide what you want to do about the bottom of the pouch. I decided I wasn’t going to need a huge pouch, so I cut off approximately 10 centimeters from the bottom and made round edges with the help of a saucer. If you want straight edges, that’s fine too of course.
Naai nu helemaal rondom.
Sew all around.
Je kunt de randjes nu nog afwerken met een zigzag of even bijknippen met de kartelschaar. Je kunt in plaats hiervan natuurlijk ook de overlocker gebruiken. Als je rechte hoekjes in je bodem hebt gebruikt moet je nog even de puntje van je hoekjes knippen.
Now finish the seams with a zagzag or cut them with pinking shears. Of course using your serger instead is also a very good option. If you made straight edges for your bottom, make sure you clip of the corners before you turn the bag inside out.
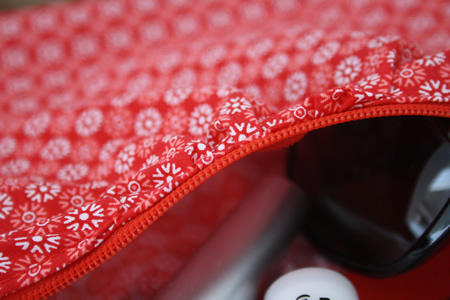
Draai nu binnenstebuiten en taadaa! Je ritstasje is klaar, imperfect en al!
Now turn inside out and voila, your zipper pouch is ready in all its imperfectness!
Één en al gerimpelde glorie en zo gemakkelijk te maken. Ik zei het toch?
In all its rippled glory, and so easy to make. I told you so!
Ik ben nu wel erg benieuwd
hoe lang al mijn spullen 'niet kwijt' zullen blijven.
I am really curious though as to how long my stuff will stay 'unlost'.


